Local HTTPS
I’m not going to extol the virtues of encrypting your site and enabling HTTP/2. The advantages should be pretty obvious by now.
The real issue is that when you’ve got your site(s) and your clients’ site(s) encrypted, you’re left with local development versions of the sites which are now at odds with the live version. And it’s always best to mirror your dev and live environments as much as possible to avoid those last-minute deployment panics. Like when I deployed the all-new Clearleft site only to find I hadn’t updated the image links to HTTPS so none of them loaded. Queue a frantic 10 minutes of find and replace throughout the site templates while people were telling me the site was b0rked. Fun times.
The solution, therefore, is to get your local development environment serving up secure sites. What follows is an amalgam of information found in this excellent post, this stackoverflow response and the code from Laravel Valet. All kudos goes to them. Laravel Valet looks like a really interesting and simple way to set up a local Mac development environment anyway. I encourage checking it out if you want fewer headaches.
I should point out that at Clearleft we use Vagrant and VirtualBox to manage a Ubuntu devbox server on each of our machines which serves our development sites from. But these steps should work directly on a Mac.
Enough waffle, more code
First you need a SAN conf file.
[ req ]

default_bits = 2048
default_keyfile = server-key.pem
distinguished_name = subject
req_extensions = req_ext
x509_extensions = x509_ext
string_mask = utf8only
prompt = no

[ subject ]

C = UK
ST = VA
L = Brighton
O = Clearleft
OU = Dev
CN = example.com

[ x509_ext ]

subjectKeyIdentifier = hash
authorityKeyIdentifier = keyid,issuer

basicConstraints = CA:FALSE
keyUsage = digitalSignature, keyEncipherment
subjectAltName = @alternate_names
nsComment = "OpenSSL Generated Certificate"

[ req_ext ]

subjectKeyIdentifier = hash

basicConstraints = CA:FALSE
keyUsage = digitalSignature, keyEncipherment
subjectAltName = @alternate_names
nsComment = "OpenSSL Generated Certificate"

[ alternate_names ]

DNS.1 = example.com
DNS.2 = subdomain.example.com
DNS.3 = anotherexample.com
I believe you can use one file and simply list all your domains to have one all-encompassing certificate for all sites, but I can’t verify that and I prefer having a conf file per site anyway.
Most of the information in there doesn’t need to be touched. The actual values can be dummy data. I do recommend changing
CN = example.com
to your site’s domain though, for reasons we’ll see later.
What needs to change is the alternate names:
[ alternate_names ]

DNS.1 = example.com
DNS.2 = subdomain.example.com
DNS.3 = anotherexample.com
Here, you make sure there is a DNS.1 = yourdomain.dev and then if you need to access the site by another url/tld or subdomain, then add those in too, incrementing the number as you go.
Put that file somewhere on your system. Save it as openssl.conf, san.conf or even domain.dev.conf or something along those lines. Next we create a self-signed certificate with openssl. This is where the certificate process can be confusing. I still don’t fully understand it but the following works, so I’m sticking with it.
openssl req -config "/path/to/san-conf-file.conf" -new -sha256 -newkey rsa:2048 -nodes -keyout "/path/to/private-key-output-file.key" -x509 -days 365 -out "/path/to/certificate-file.crt"
This will create the two necessary files, the certificate file and the private key file which you then need to add to your site’s conf file in Apache or nginx or whatever you use. Here’s an example of my site:
server {
    listen 443 ssl http2;

    server_name gablaxian.dev;

    ssl_certificate     /path/to/gablaxian.dev.crt;
    ssl_certificate_key /path/to/gablaxian.dev.key;

    //...
Restart your server and you will now have your site serving up an encrypted local version! However… If you browse to your dev site you will get a big fat privacy warning. At this point you may be able to get away with clicking a link or two and telling the browser to accept this unsigned certificate and be on your merry way. But I can’t guarantee that. Instead, we can get your certificate ‘trusted’ by your system and then your site will load up just fine.
To do that, get your certificate file accessible by your Mac, so if you created it on a virtual machine then copy it from the VM to your machine first. Then you can use the OSX’s terminal command security to trust that certificate with:
sudo security add-trusted-cert -d -r trustRoot -k /Library/Keychains/System.keychain "/path/to/certificate-file.crt"
And as if by magic, you can now browse your secure site! (If you can’t be sure to hard refresh the site or browse with dev tools open. If you got the warning on first visit the browser often remembers).
And we can see that if you open Keychain
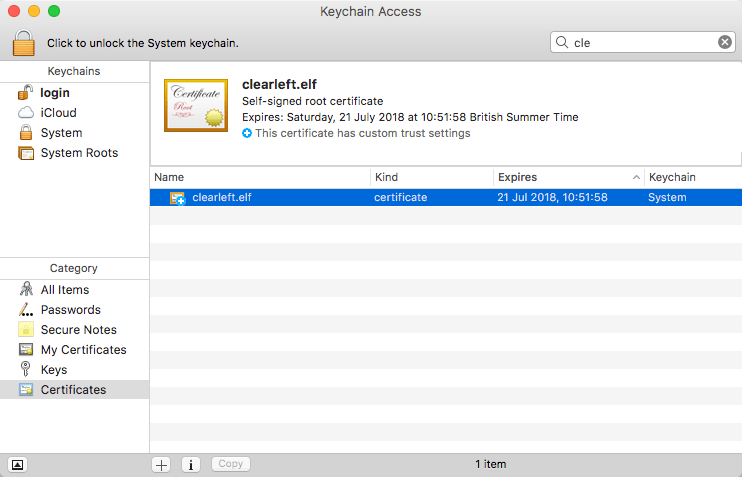 (click for larger image)
This is where changing the CN value was useful, Now you can see which domain each certificate is responsible for.
If you need to revoke the certificate, then you can run
sudo security delete-certificate -c "yourdomain.dev" /Library/Keychains/System.keychain -t
Lovely. My advice is to wrap all that up in whatever scripting language you fancy.