Welcome back, dear Internet traveller. I hope you’re sitting comfortably, because we’re going to cover a lot of ground in this part.
The general aim of our ‘game engine’ is to find a small set of common object onto which the rest of the game is built. It provides us with some reusable components which simply help us keep a clean and maintainable codebase and provide some naming conventions down the line.
Providing focus
A good game engine would allow us to theoretically build the entire game with, but we’re learning here and are going to keep things to a smaller scale. So, what we’ll be building will be confined to fleshing out a small 4x2-ish grid of rooms at the starting area of the game. In these rooms, there are elements which cover around 80%-90% of the game’s mechanics anyway.
Here we see the starting areas from The Legend of Zelda:
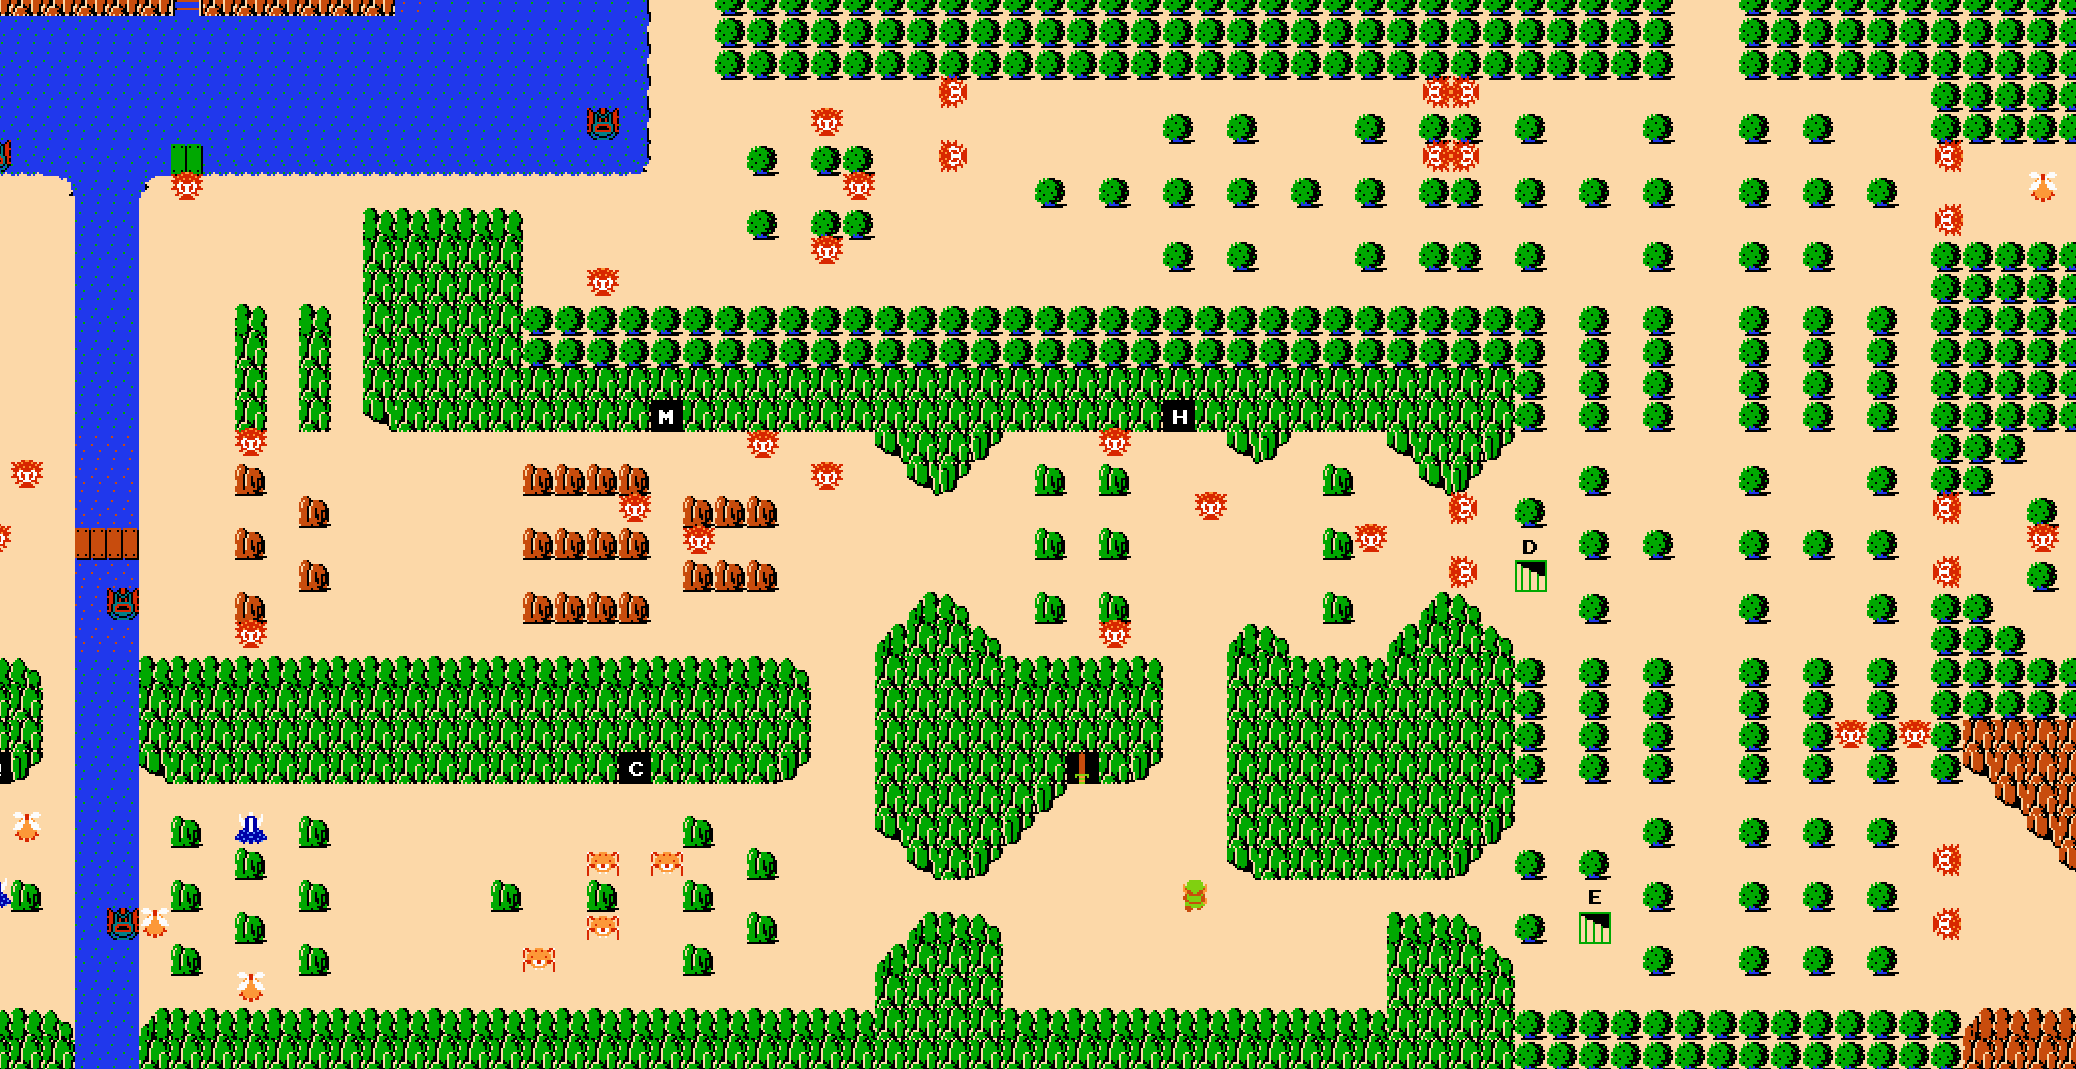 (Click for larger image)
Using the editor I have laid out these first rooms like so:
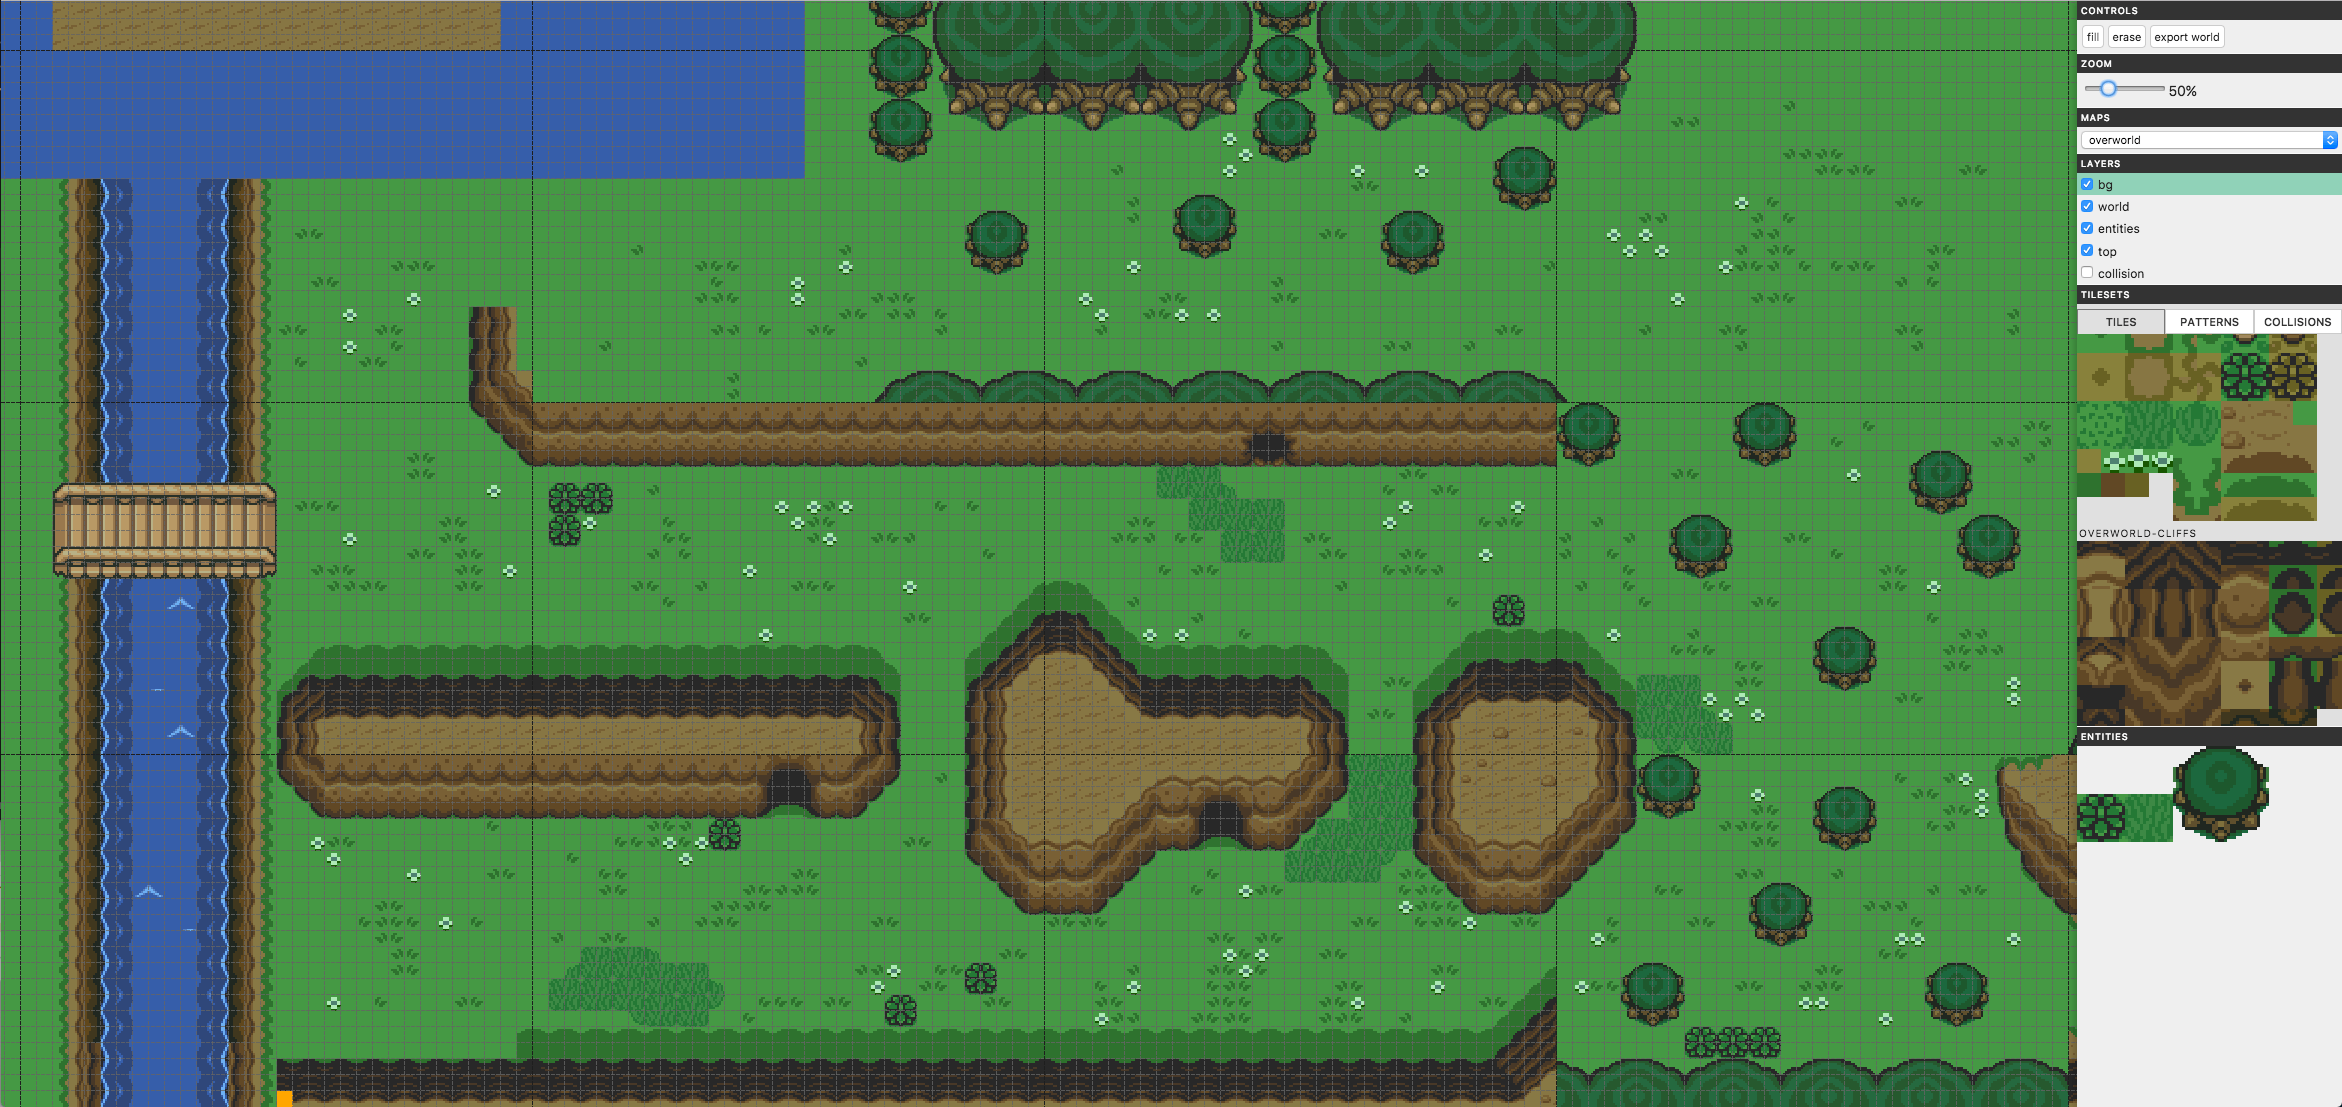 (Click for larger image)
Straight away you can see we’ve got walls, animated tiles, bushes, a cave entrance and the player. And then, on the less visible side, we’ve got the concept of rooms, which are a collection of tile layers, and then there’s the collisions.
Do the code shuffle
First step is to attempt a logical file and folder structure. So what we’ve got now is:
js
    - data
        - config.js
        - game_data.js
        - world.js
    - engine
        - enemy.js
        - entity.js
        - input.js
        - layer.js
        - room.js
        - tween.js
        - utils.js
    - tools
        - debugger.js
        - stats.js
    - hud.js
    - inventory.js
    - link.js
    - main.js
    - map.js
    - projectile.js
The idea is to have data, both engine setup and game world, in one folder. Then we’ve got the ‘engine’ code in a folder. Then some tools unrelated to the game or the engine in another folder and, finally, at the top level all the objects, including the main game object, which use the engine to create the actual game.
Well I think it makes sense…
The Engine
Taking what we already had from the last part, we can move our code around to make the following objects: Room and Layer.
Layer
Previously, each room looped over each of the layers in the DB and called drawImage for each tile which resulted in thousands of draw calls per frame. It was still well under our frame budget but by creating a Layer object, we can kill two birds with one stone. Firstly, we provide a nice object to create and interact with a layer, and secondly, we can use it to store a whole layer’s tile information as a bitmap (canvas) and just draw the whole thing at once. We’re trading memory for performance in this case:
const Layer = {

    init() {
        this.width          = ROOM_WIDTH;
        this.height         = ROOM_HEIGHT;

        this.canvas         = document.createElement('canvas');
        this.context        = this.canvas.getContext('2d');

        this.canvas.width   = ROOM_WIDTH;
        this.canvas.height  = ROOM_HEIGHT;

        return this;
    },

    render(context) {
        context.drawImage(this.canvas, 0, 0, this.width, this.height);
    }

};
Really simple. And then, using a Room object, we do the heavy lifting and draw straight to a layer’s canvas during room load.
Room
The Room object will focus on all the tasks required for a Room creation and its entities. It localises a given room’s content from the DB so that there are fewer checks and loops during gameplay:
const Room = {

    init(coords=[0,0]) {
        this.coords     = coords;
        this.width      = ROOM_WIDTH;
        this.height     = ROOM_HEIGHT;

        this.TILES_WIDE = NUM_TILES_WIDE;
        this.TILES_HIGH = NUM_TILES_HIGH;

        this.collisions = new Uint8Array(NUM_TILES_WIDE * NUM_TILES_HIGH);
        this.layers     = [];
        this.animLayers = [];   // 3 layers which store the animated tile frames.
        this.enemies    = [];
        this.entities   = [];


        this.timeSinceLastTileFrameSwap  = 0;
        this.tileSequenceIdx             = 0;

        this.setupLocalData();
        this.createLayers();

        return this;
    },

    //...
When a room loads, it stores the room coords of the current map, then sets its width and height and sets up internal arrays for collisions, layers, enemies and entities. Then, using this.setupLocalData() we get all enemies/entities and collisions from the main DB which are only in this room and store them. Finally, the layers are created, including 3 animation layers which work just like the player sprite animations. This allows us to draw the background layer, then loop through the animation layers at 7fps drawing the relevant frame before the world layer, then the top layer.
Entities
Entities are, generally speaking, the base class for all objects in the game world. They have a position, a width and a height. They can be collided with, invisible, destructible, damaging, affected by physics or a mix of the above and more. The player or players and enemies are usually just an extension of an entity. But for this game, entities are just the simple game world objects, while enemies and the player are their own objects.
Entities are added in bulk using the editor. When exported from the editor, they are simply an ID and a position relative to the whole map. Using the game_world.js file we set the definitions of these entities:
const ENTITY_CFG = {
    ENTRANCE:   { sx: 0, sy: 0, w: 16, h: 1 },
    BUSH1:      { tileset: 'overworld-terrain', sx: 48, sy: 48, w: 16, h: 16 },
    GRASS:      { tileset: 'overworld-terrain', sx: 16, sy: 64, w: 16, h: 16 },
    TREE:       { tileset: 'overworld-flora', sx: 0, sy: 80, w: 40, h: 40 },
};
We set what tileset they use, the crop, and their widths and heights. As you can see I’ve added an entity called ‘entrance’. This is invisible because we only want the entity for its collision detection and not anything else, highlighting the versatility of an entity. But why is this useful?
Let’s take a look at some LoTP footage:
Here we see Link entering a house. What do you notice? Link goes under the roof of the entrance. This feels like it would be a fair amount of work to make an entity do and is quite specific to this entity. Instead, we can can use the level editor to lay out the tiles and place them onto the required layers and just place an invisible entity inside for link to collide with! These sorts of tricks are in every game you’ve ever played. I guarantee it.
So as not to spend even more time on the editor, there are a number of entities I’ll be adding by hand because they need specific IDs for me to attach functionality to on collision, such as the entrances. Adding in the ability to set IDs to selected entities would just be too time-consuming at this stage. And so, in the game_world.js file we have:
const ENTITIES = [
    { id: 'entrance1', type: 'entrance', mapID: 'overworld', roomID: [7,7], x: 80, y: 24, visible: false },
    { id: 'entrance2', type: 'entrance', mapID: 'cave1', roomID: [0,0], x: (ROOM_WIDTH/2)-8, y: ROOM_HEIGHT-10, visible: false },
];
Here we can give an entity all the properties they need to be set up and for us to identify them during gameplay.
Enemy
I won’t say much about enemy just yet as I’ve not added any, other than to say it is its own object due to the reasons mentioned earlier. Yes, much of the code is similar to an entity, but their ability to move and ‘think’ autonomously will make them different enough that I’d rather not add all that code into an entity. I may see if I can ‘compose’ the object a bit better later but for now its just a load of repeated code.
Input
Input has been modified so that it was more abstracted. Before, if we wanted to watch for a new key, we would have to edit the Input.js file, which isn’t very reusable. It also struck me that the code wasn’t very resilient to altering the key configuration. So I fixed both issues at the same time.
Now Input has an internal mapping of several keys to their codes. We could add them all, but I have no need for that currently. If nothing is passed into the Input.init() then we can use Input.isPressed('ctrl') and be on our way. But, we can also provide a custom mapping along the lines of:
const KEYS = {
    LEFT:   'LEFT',
    UP:     'UP',
    DOWN:   'DOWN',
    RIGHT:  'RIGHT',
    START:  'ENTER',
    SELECT: 'SHIFT',
    ATTACK: 'A',
    ITEM:   'S'
};
And pass it in with Input.init(KEYS). This maps new words to Inputs internal mapping names so that we can then do Input.isPressed('attack') and, in this case, it will check for the A key. In future, if we want to change the attack key to, space
then we can and not break all our code. Fancy.
Tween
Adapted from my own web animation library, Tweens are a good way to animate an object between two values over time, easily and independently. So far I’m using it to move Link back across the screen during room load, e.g:
let tween = Object.create(Tween).init(Game.player, {x: Game.player.x}, {x: ROOM_WIDTH - 32}, 1000);
Collecting Information
This wouldn’t be proper game development if we didn’t have some way of seeing constantly updated game data during gameplay. I’ve made a start with two simple tools for inspecting game data. Both of which only show when DEBUG is set to true;
Debugger
This works as a sort of watcher. Using it, I can list some bits of the game I want to monitor, like the player’s position, and I simply attach a HTML element to that value and keep it updated at around 25fps. The important thing is not to integrate it with the game if possible. I literally just grab a value with Link.x every 40-ish ms and display it to the screen.
Stats
This one is more limited than the debugger but is integrated with the game. For now it just gathers the time taken to render a frame and stores the minimum and maximum times. Just a useful measurement to show we’re staying performant.
Connecting up
The rest of the code has been cleaned up a bit and parts of it rewritten to factor in the new engine code. I also took the opportunity to entity collision checks but only act on the entrances, which now can load in new maps! Exciting!
This has been a bit more of an overview than I may have liked, but it’s hard to write about code, especially when it it’s this much and is has little visual impact.
As usual you can see the all the code on github anyway
Progress
Check out the editor (with more tilesets and entities) on version 0.10
Try out v0.10 of the game which uses the updated editor level output.
Or see all the source code on Github.