This area of game development has given me the most grief of all. And it’s mostly been me making mountains out of molehills. So let’s just start small and work our way up. See where we get.
Levels are your game’s database. They hold the geometry, enemy positions, entity positions, events and triggers and also tie the background to the image assets.
The isometric RPG style of game, like Zelda, comes under the banner of ‘tile-based’. They are top down and so the background of each screen is essentially the floor, whereas, in a side-scrolling game, the background would often be the scenery in the far distance. In a tile-based game the screen is split up into a grid of cells which are used to draw the backgrounds and provide the basis for collisions and entity positions. Zelda:LttP used cells of 8px by 8px.
There are a few ways we could store this information, but let’s jump right in and get a rudimentary level layout drawn on screen. The way we do that is with big blocks of colour. Assets usually come later on in a game’s development and how they’re built can be dependent on how the engine is going to handle them (also, why design assets for elements of the game that don’t make it into the final build?). So, in the short term, to test a game’s viability, either flat (bordered or shaded) colours, or simple placeholder images are often used. We shall start there.
I’ve made a few minor modifications to the code since the last update. The game is now scaled up by a factor of 2 (and uses Chrome’s new CSS property) and I decided to stop using comma-separated variable declarations e.g. var a, b, c;. They now have their own var and ending ;. Comma-separated style just leads to broken code way too often.
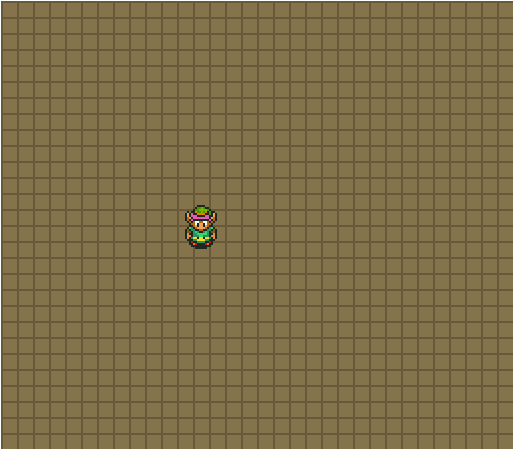
With those tweaks added we move onto the background by adding the new function… drawBackground()! So inventive. Anyway, in this function we can get a feel for how our screens are going to be drawn. As I mentioned above, Zelda:LttP is a tile-based game of 8x8 cells. For now, drawing the background will be a loop which draws an 8x8 rectangle or ‘tile’ which we can visualise as a brown square with a darker brown border.
function drawBackground() {
    for (var row = 0; row < (height/8); row++) {
        for (var col = 0; col < (width/8); col++) {
            var x = (col _ 8);
            var y = (row _ 8);

            ctx.fillStyle = '#85724E';
            ctx.fillRect(x, y, 8, 8);

            ctx.strokeStyle = '#68583A';
            ctx.strokeRect(x+0.5, y+0.5, 8, 8);
        }
    }
}
It’s a bit rough but it helps us get a picture of how a background is drawn. For every frame of the game, we are breaking down the width of the game screen into 8 for the total rows, then for each row, we break down the height of the game screen into 8 again. For each cell we draw an 8x8 rectangle (with stroke for definition) the move down 8px and draw another. When a column is complete we move to the next row and start again.
Slap that into the main() function, just after we clear the screen:
function main() {
    // ...

    lastTime = now;

    // Clear the screen
    ctx.clearRect(0, 0, 256, 224);

    drawBackground();

    var speed = 2;

    // ...
}
and we get:
Excellent! It is, however, the next steps that start making it interesting. The previous code helps us draw the dirt/grass/sand. That stuff is just decorative. The interesting stuff is when a tile has structure. Like when it’s a wall, or water, or a trap. Perhaps it animates like grass blowing in the wind, or perhaps it’s destructive, like a shrub of grass you can cut, or what if it’s a cave which, if entered, triggered the loading of a new area (all of these things happen in Zelda:LTTP, btw).
The question, then, is how do we go about storing this information? Considering we’re just using placeholder tiles for now, the quickest and simplest solution is to create a big array. We’re also going to use a multidimensional array (array[0][0]) just so traversing the array is a bit cleaner. The array size is going to be the number of row cells by the number of column cells, or height/8 by width/8 which, in our case, is 32 x 28. The values of each of the cells will be a number which represents a cell type. For now this will be 0 for empty (black), 1 for dirt/sand and 2 for a wall.
This is going to be a lot easier to work with as a separate object. For now we’ll create this variable at the top of the file, called world and then within that, the var level. This gives us scope to create other variables inside world to handle other aspect of our game in the future, like enemy placements.
The file looks like so:
var world = {
    level: [
        [1, 1, 1, 1, 1, 1, 1, 1, 1, 1, 1, 1, 1, 1, 1, 1, 1, 1, 1, 1, 1, 1, 1, 1, 1, 1, 1, 1, 1, 1, 1, 1],
        [1, 1, 1, 1, 1, 1, 1, 1, 1, 1, 1, 1, 1, 1, 1, 1, 1, 1, 1, 1, 1, 1, 1, 1, 1, 1, 1, 1, 1, 1, 1, 1],
        [1, 1, 1, 1, 1, 1, 1, 1, 1, 1, 1, 1, 1, 1, 1, 1, 1, 1, 1, 1, 1, 1, 1, 1, 1, 1, 1, 1, 1, 1, 1, 1],
        [1, 1, 1, 1, 1, 1, 1, 1, 1, 1, 1, 1, 1, 1, 1, 1, 1, 1, 1, 1, 1, 1, 1, 1, 1, 1, 1, 1, 1, 1, 1, 1],
        [1, 1, 1, 1, 1, 1, 1, 1, 1, 1, 1, 1, 1, 1, 1, 1, 1, 1, 1, 1, 1, 1, 1, 1, 1, 1, 1, 1, 1, 1, 1, 1],
        [1, 1, 1, 1, 1, 1, 1, 1, 1, 1, 1, 1, 1, 1, 1, 1, 1, 1, 1, 1, 1, 1, 1, 1, 1, 1, 1, 1, 1, 1, 1, 1],
        [1, 1, 1, 1, 1, 1, 1, 1, 1, 1, 1, 1, 1, 1, 1, 1, 1, 1, 1, 1, 1, 1, 1, 1, 1, 1, 1, 1, 1, 1, 1, 1],
        [1, 1, 1, 1, 1, 1, 1, 1, 1, 1, 1, 1, 1, 1, 1, 1, 1, 1, 1, 1, 1, 1, 1, 1, 1, 1, 1, 1, 1, 1, 1, 1],
        [1, 1, 1, 1, 1, 1, 1, 1, 1, 1, 1, 1, 1, 1, 1, 1, 1, 1, 1, 1, 1, 1, 1, 1, 1, 1, 1, 1, 1, 1, 1, 1],
        [1, 1, 1, 1, 1, 1, 1, 1, 1, 1, 1, 1, 1, 1, 1, 1, 1, 1, 1, 1, 1, 1, 1, 1, 1, 1, 1, 1, 1, 1, 1, 1],
        [1, 1, 1, 1, 1, 1, 1, 1, 1, 1, 1, 1, 1, 1, 1, 1, 1, 1, 1, 1, 1, 1, 1, 1, 1, 1, 1, 1, 1, 1, 1, 1],
        [1, 1, 1, 1, 1, 1, 1, 1, 1, 1, 1, 1, 1, 1, 1, 1, 1, 1, 1, 1, 1, 1, 1, 1, 1, 1, 1, 1, 1, 1, 1, 1],
        [1, 1, 1, 1, 1, 1, 1, 1, 1, 1, 1, 1, 1, 1, 1, 1, 1, 1, 1, 1, 1, 1, 1, 1, 1, 1, 1, 1, 1, 1, 1, 1],
        [1, 1, 1, 1, 1, 1, 1, 1, 1, 1, 1, 1, 1, 1, 1, 1, 1, 1, 1, 1, 1, 1, 1, 1, 1, 1, 1, 1, 1, 1, 1, 1],
        [1, 1, 1, 1, 1, 1, 1, 1, 1, 1, 1, 1, 1, 1, 1, 1, 1, 1, 1, 1, 1, 1, 1, 1, 1, 1, 1, 1, 1, 1, 1, 1],
        [1, 1, 1, 1, 1, 1, 1, 1, 1, 1, 1, 1, 1, 1, 1, 1, 1, 1, 1, 1, 1, 1, 1, 1, 1, 1, 1, 1, 1, 1, 1, 1],
        [1, 1, 1, 1, 1, 1, 1, 1, 1, 1, 1, 1, 1, 1, 1, 1, 1, 1, 1, 1, 1, 1, 1, 1, 1, 1, 1, 1, 1, 1, 1, 1],
        [1, 1, 1, 1, 1, 1, 1, 1, 1, 1, 1, 1, 1, 1, 1, 1, 1, 1, 1, 1, 1, 1, 1, 1, 1, 1, 1, 1, 1, 1, 1, 1],
        [1, 1, 1, 1, 1, 1, 1, 1, 1, 1, 1, 1, 1, 1, 1, 1, 1, 1, 1, 1, 1, 1, 1, 1, 1, 1, 1, 1, 1, 1, 1, 1],
        [1, 1, 1, 1, 1, 1, 1, 1, 1, 1, 1, 1, 1, 1, 1, 1, 1, 1, 1, 1, 1, 1, 1, 1, 1, 1, 1, 1, 1, 1, 1, 1],
        [1, 1, 1, 1, 1, 1, 1, 1, 1, 1, 1, 1, 1, 1, 1, 1, 1, 1, 1, 1, 1, 1, 1, 1, 1, 1, 1, 1, 1, 1, 1, 1],
        [1, 1, 1, 1, 1, 1, 1, 1, 1, 1, 1, 1, 1, 1, 1, 1, 1, 1, 1, 1, 1, 1, 1, 1, 1, 1, 1, 1, 1, 1, 1, 1],
        [1, 1, 1, 1, 1, 1, 1, 1, 1, 1, 1, 1, 1, 1, 1, 1, 1, 1, 1, 1, 1, 1, 1, 1, 1, 1, 1, 1, 1, 1, 1, 1],
        [1, 1, 1, 1, 1, 1, 1, 1, 1, 1, 1, 1, 1, 1, 1, 1, 1, 1, 1, 1, 1, 1, 1, 1, 1, 1, 1, 1, 1, 1, 1, 1],
        [1, 1, 1, 1, 1, 1, 1, 1, 1, 1, 1, 1, 1, 1, 1, 1, 1, 1, 1, 1, 1, 1, 1, 1, 1, 1, 1, 1, 1, 1, 1, 1],
        [1, 1, 1, 1, 1, 1, 1, 1, 1, 1, 1, 1, 1, 1, 1, 1, 1, 1, 1, 1, 1, 1, 1, 1, 1, 1, 1, 1, 1, 1, 1, 1],
        [1, 1, 1, 1, 1, 1, 1, 1, 1, 1, 1, 1, 1, 1, 1, 1, 1, 1, 1, 1, 1, 1, 1, 1, 1, 1, 1, 1, 1, 1, 1, 1],
        [1, 1, 1, 1, 1, 1, 1, 1, 1, 1, 1, 1, 1, 1, 1, 1, 1, 1, 1, 1, 1, 1, 1, 1, 1, 1, 1, 1, 1, 1, 1, 1]
    ]
}
Each cell is populated with the value 1 which sets each tile to ‘dirt’. Instantly you can see the appeal to using this approach and layout, which is you can now visualise the screen almost Matrix style. In the short term we can paint with code, so-to-speak, and construct the starting area to our game.
It’s worth noting that the original Zelda firstly not only had a different resolution and therefore a different, lower count of tiles, but also used a fair chunk of the top part of the screen for its HUD. Zelda:LTTP used an overlay for its HUD and then a modal overlay for its inventory management. We’re going to have to take some liberties in the reconstruction of Zelda into its LTTP remaster. At some point we’re going to have to decide how to handle this difference between the two games, but not just yet. Here is the NES Zelda’s starting area:
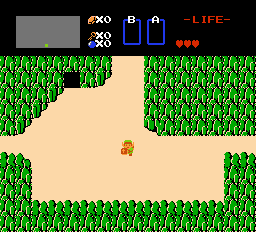
Rather conveniently there are only 3 different types of tile there; dirt, cave entrance and rock (wall).
Taking the above level array, we shall ‘paint’ in walls along the top and bottom and also a cave area:
var world = {
    level: [
        [2, 2, 2, 2, 2, 2, 2, 2, 2, 2, 2, 2, 2, 2, 2, 1, 1, 1, 1, 2, 2, 2, 2, 2, 2, 2, 2, 2, 2, 2, 2, 2],
        [2, 2, 2, 2, 2, 2, 2, 2, 2, 2, 2, 2, 2, 2, 2, 1, 1, 1, 1, 2, 2, 2, 2, 2, 2, 2, 2, 2, 2, 2, 2, 2],
        [2, 2, 2, 2, 2, 2, 2, 0, 0, 2, 2, 2, 2, 2, 2, 1, 1, 1, 1, 2, 2, 2, 2, 2, 2, 2, 2, 2, 2, 2, 2, 2],
        [2, 2, 2, 2, 2, 2, 2, 0, 0, 2, 2, 2, 2, 2, 2, 1, 1, 1, 1, 2, 2, 2, 2, 2, 2, 2, 2, 2, 2, 2, 2, 2],
        [2, 2, 2, 2, 2, 2, 1, 1, 1, 1, 1, 1, 1, 1, 1, 1, 1, 1, 1, 2, 2, 2, 2, 2, 2, 2, 2, 2, 2, 2, 2, 2],
        [2, 2, 2, 2, 2, 1, 1, 1, 1, 1, 1, 1, 1, 1, 1, 1, 1, 1, 1, 2, 2, 2, 2, 2, 2, 2, 2, 2, 2, 2, 2, 2],
        [2, 2, 2, 2, 1, 1, 1, 1, 1, 1, 1, 1, 1, 1, 1, 1, 1, 1, 1, 2, 2, 2, 2, 2, 2, 2, 2, 2, 2, 2, 2, 2],
        [2, 2, 2, 1, 1, 1, 1, 1, 1, 1, 1, 1, 1, 1, 1, 1, 1, 1, 1, 2, 2, 2, 2, 2, 2, 2, 2, 2, 2, 2, 2, 2],
        [2, 2, 1, 1, 1, 1, 1, 1, 1, 1, 1, 1, 1, 1, 1, 1, 1, 1, 1, 2, 2, 2, 2, 2, 2, 2, 2, 2, 2, 2, 2, 2],
        [2, 1, 1, 1, 1, 1, 1, 1, 1, 1, 1, 1, 1, 1, 1, 1, 1, 1, 1, 2, 2, 2, 2, 2, 2, 2, 2, 2, 2, 2, 2, 2],
        [2, 1, 1, 1, 1, 1, 1, 1, 1, 1, 1, 1, 1, 1, 1, 1, 1, 1, 1, 2, 2, 2, 2, 2, 2, 2, 2, 2, 2, 2, 2, 2],
        [2, 1, 1, 1, 1, 1, 1, 1, 1, 1, 1, 1, 1, 1, 1, 1, 1, 1, 1, 1, 2, 2, 2, 2, 2, 2, 2, 2, 2, 2, 2, 2],
        [1, 1, 1, 1, 1, 1, 1, 1, 1, 1, 1, 1, 1, 1, 1, 1, 1, 1, 1, 1, 1, 1, 1, 1, 1, 1, 1, 1, 1, 1, 1, 1],
        [1, 1, 1, 1, 1, 1, 1, 1, 1, 1, 1, 1, 1, 1, 1, 1, 1, 1, 1, 1, 1, 1, 1, 1, 1, 1, 1, 1, 1, 1, 1, 1],
        [1, 1, 1, 1, 1, 1, 1, 1, 1, 1, 1, 1, 1, 1, 1, 1, 1, 1, 1, 1, 1, 1, 1, 1, 1, 1, 1, 1, 1, 1, 1, 1],
        [1, 1, 1, 1, 1, 1, 1, 1, 1, 1, 1, 1, 1, 1, 1, 1, 1, 1, 1, 1, 1, 1, 1, 1, 1, 1, 1, 1, 1, 1, 1, 1],
        [2, 2, 1, 1, 1, 1, 1, 1, 1, 1, 1, 1, 1, 1, 1, 1, 1, 1, 1, 1, 1, 1, 1, 1, 1, 1, 1, 1, 2, 2, 2, 2],
        [2, 2, 2, 1, 1, 1, 1, 1, 1, 1, 1, 1, 1, 1, 1, 1, 1, 1, 1, 1, 1, 1, 1, 1, 1, 1, 1, 1, 2, 2, 2, 2],
        [2, 2, 2, 1, 1, 1, 1, 1, 1, 1, 1, 1, 1, 1, 1, 1, 1, 1, 1, 1, 1, 1, 1, 1, 1, 1, 1, 1, 2, 2, 2, 2],
        [2, 2, 2, 1, 1, 1, 1, 1, 1, 1, 1, 1, 1, 1, 1, 1, 1, 1, 1, 1, 1, 1, 1, 1, 1, 1, 1, 1, 2, 2, 2, 2],
        [2, 2, 2, 1, 1, 1, 1, 1, 1, 1, 1, 1, 1, 1, 1, 1, 1, 1, 1, 1, 1, 1, 1, 1, 1, 1, 1, 1, 2, 2, 2, 2],
        [2, 2, 2, 1, 1, 1, 1, 1, 1, 1, 1, 1, 1, 1, 1, 1, 1, 1, 1, 1, 1, 1, 1, 1, 1, 1, 1, 1, 2, 2, 2, 2],
        [2, 2, 2, 1, 1, 1, 1, 1, 1, 1, 1, 1, 1, 1, 1, 1, 1, 1, 1, 1, 1, 1, 1, 1, 1, 1, 1, 1, 2, 2, 2, 2],
        [2, 2, 2, 1, 1, 1, 1, 1, 1, 1, 1, 1, 1, 1, 1, 1, 1, 1, 1, 1, 1, 1, 1, 1, 1, 1, 1, 1, 2, 2, 2, 2],
        [2, 2, 2, 1, 1, 1, 1, 1, 1, 1, 1, 1, 1, 1, 1, 1, 1, 1, 1, 1, 1, 1, 1, 1, 1, 1, 1, 1, 2, 2, 2, 2],
        [2, 2, 2, 1, 1, 1, 1, 1, 1, 1, 1, 1, 1, 1, 1, 1, 1, 1, 1, 1, 1, 1, 1, 1, 1, 1, 1, 1, 2, 2, 2, 2],
        [2, 2, 2, 2, 2, 2, 2, 2, 2, 2, 2, 2, 2, 2, 2, 2, 2, 2, 2, 2, 2, 2, 2, 2, 2, 2, 2, 2, 2, 2, 2, 2],
        [2, 2, 2, 2, 2, 2, 2, 2, 2, 2, 2, 2, 2, 2, 2, 2, 2, 2, 2, 2, 2, 2, 2, 2, 2, 2, 2, 2, 2, 2, 2, 2]
    ]
}
We then update our drawBackground() function to take into account this new world and level array. Empty cells will be drawn black, dirt as the previous brown and walls as red.
function drawBackground() {

    var level = world.level;

    for (var row = 0; row < (height/8); row++) {
        for (var col = 0; col < (width/8); col++) {
            var tile = level[row][col];
            var x = (col * 8);
            var y = (row * 8);

            if( tile == 0 ) {
                ctx.fillStyle = '#000';
                ctx.strokeStyle = '#000';
            }
            else if( tile == 1 ) {
                ctx.fillStyle = '#85724E';
                ctx.strokeStyle = '#68583A';
            }
            else if( tile == 2 ) {
                ctx.fillStyle = '#f88';
                ctx.strokeStyle = '#f00';
            }

            ctx.fillRect(x, y, 8, 8);
            ctx.strokeRect(x+0.5, y+0.5, 8, 8);
        }
    }

}
First set the level array to a local variable. Run our cell drawing loops and use the row and col variables to grab the cell type in the level array, store that to make the checks more readable, then set the fill colour and stroke colours depending on which cell it is. Finish by drawing the cell. And here’s what it looks like!
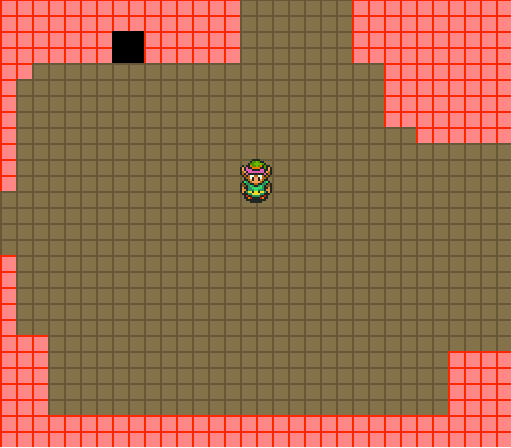
There we have it! A rudimentary level.
Collision
We’ve done well, but we’re not done yet. It’s definitely beginning to look the part, but it’s lacking some substance. Our walls are nothing more than coloured blocks at the moment. To make them seem like real walls, Link shouldn’t be able to pass over them but instead collide with them.
Collision occurs when the position and dimensions of an entity overlap with another’s. The simplest and most efficient way to perform these collisions is between two rectangles with the ‘bounding box’ collision detection algorithm. Even in complex 3d games, developers are always looking at ways to use invisible boxes around complex shapes in order to cut down on processing (albeit with the added 3rd dimension) because of how efficient it is. Here’s an example of the algorithm:
var entity1 = { x: 10, y: 10, width: 10, height: 10; }
var entity2 = { x: 15, y: 15, width: 10, height: 10; }

if(
    (entity1.x + entity1.width) > entity2.x &&
    entity1.x < (entity2.x + entity2.width) &&
    (entity1.y + entity1.height) > entity2.y &&
    entity1.y < (entity2.y + entity2.height) &&
) {

        // collision!

}
The beauty of it is that it reduces a collision check down to 4 additions and 4 conditions and, even better, if one of the conditions is false, it stops checking the rest so it may only do one addition and check before stopping. Pretty good. But still bear in mind that there is still one thing more efficient than an efficient algorithm which is not to run it at all. In other words, on each frame update, should we be checking every tile on the screen to see if Link has collided with it? Probably not. Keeping that in mind, we’ll move on.
Let’s start with some simple but, ultimately, redundant collision detection by checking that the player is within the bounds of the screen. Why is it redundant? Well, if you remember Zelda and Zelda:LTTP, when a player reaches the edges of a screen, it scrolled to the next area. Areas you could not access were blocked by walls or objects of some type. So, this logic would never be needed. But it’s good see it in action and helps us out until we get that scrolling mechanic built.
The first step is to create a function to house our collision detections. We shall call it... checkCollisions(). We are on fire with these function names. Let’s get this literary masterpiece into the main() function. Here we see why we previously created separate update() and draw() functions for Link as we place the new function in between the updates and the draws. This way, in future if and when collisions occur, after entities have updated themselves, we can do some final processing if we detect collisions before entities are drawn to the screen. Anyway, I’m getting ahead of myself. We should get some code into that new function.
function checkCollisions() {
    if( link.x < 0 ) {
        link.x = 0;
    }
    if( link.y < 0 ) {
        link.y = 0;
    }
    if( (link.x + link.width) > width ) {
        link.x = width - link.width;
    }
    if( (link.y + link.height) > height ) {
        link.y = height - link.height;
    }
}
Simpler than the bounding box collision checking, but you can see some of the principles in action.
Now we get to the trickier part of calculating collisions between Link and the red tiles. The fun bit is that Link’s dimensions are bigger than a cell. Link, at 17px by 25px is, in fact, over 2 cells wide and over 3 cells tall. At first glance you might expect to check the two cells above, the two cells below and the three cells left and right. But given that this is an isometric game, it is supposed to give the illusion that we are looking down at an angle, so you would expect that Link’s head would pass over objects, but his body would not. Contrary to Link’s image height of 25px, his collision height will be the same as his width. For the purposes of tile collision, then, Link is really a 17x16 block.
The way I have currently implemented tile-based collision is probably horribly inefficient, and/or stupid. But that’s what this process is all about. The idea is as follows:
- Check the player is moving
- Depending on which direction they move, get the two cells on that side which Link is currently occupying.
- Check whether at least one of those tiles is a wall (value 2)
- If so, set Link’s position to outer bounds of that cell.
Get ready for some proper hacky code. We’re going to dump all our code into the checkCollisions() function we’ve already got. After the screen boundary collision checks, we just start detecting presses just like when we move Link:
if( key[2] ) { // up

}
if( key[3]) { // down

}
if( key[0]) { // left

}
if( key[1]) { //right

}
When Link walks up we check his collision box’s top left and top right coordinates which, if you recall, is 16x16px at the base of his image, or 9px below the top of his head, to see which cell they are currently in. Link’s x and y values are pixel coordinates within the 256x224px canvas, but we’ve broken the screen down in to 8x8 cells: 32x28. If Link’s x value were 0-7 he would be in column 1. If it were 8-15, column 2 and if it were 168-175 it would be column 21. Knowing the x value means we can do a simple calculation to see which cell it falls into by dividing x by 8 and discarding the remainder. For example, 170 / 8 = 21.25 which is the 21st cell. We can easily remove the remainder by using the Math.floor() function which gives us var col = Math.floor( Link.x / 8 ). Using the row and column values we can directly access the level array and check the value. If the value returned is 2, then it’s a wall, so, collision! Let’s see what that looks like.
if( key[2] ) { // up
    var topLeftCol = Math.floor(link.x / 8);
    var topRightCol = Math.floor((link.x+link.width) / 8);
    var row = Math.floor((link.y+9) / 8); // same for topleft and topright

    // now get the cell
    if( level[row][topLeftCol] == 2 || level[row][topRightCol] == 2 ) {
        // collision!
    }

}
I’ve taken the liberty of making the level variable a global and setting it in init() as opposed to having a local variable set on each loop of drawBackground(). Hopefully, that code above should make some sense. But at the moment, it only detects the collision. Next we need to do something about it. Once a collision is detected, we need to get the y value of the bottom of the wall we collided with and set Link’s y value to that (row*8):
if( key[2] ) { // up
    var topLeftCol = Math.floor(link.x / 8);
    var topRightCol = Math.floor((link.x+link.width) / 8);
    var row = Math.floor((link.y+9) / 8); // same for topleft and topright

    // now get the cells for each corner and check 'em!
    if( level[row][topLeftCol] == 2 || level[row][topRightCol] == 2 ) {
        link.y = (row * 8);
    }

}
Okay! Link can no longer walk up past walls. Next we do the same for each of the other directions, changing which tiles we check against and setting Link’s x or y values in accordance. And that, looks like this:
if( key[2] ) { // up
    var topLeftCol = Math.floor(link.x / 8);
    var topRightCol = Math.floor((link.x+link.width-1) / 8);
    var row = Math.floor((link.y+9) / 8); // same for topleft and topright

    // now get the cells for each corner and check 'em!
    if( level[row][topLeftCol] == 2 || level[row][topRightCol] == 2 ) {
        link.y = (row * 8);
    }

}
if( key[3]) { // down
    var bottomLeftCol = Math.floor(link.x / 8);
    var bottomRightCol = Math.floor((link.x+link.width-1) / 8);
    var row = Math.floor((link.y+link.height) / 8);

    if( level[row][bottomLeftCol] == 2 || level[row][bottomRightCol] == 2 ) {
        link.y = (row * 8) - link.height;
    }

}
if( key[0]) { // left
    var col = Math.floor(link.x / 8);
    var topLeftRow = Math.floor((link.y+9) / 8);
    var bottomLeftRow = Math.floor((link.y+link.height-1) / 8);

    if( level[topLeftRow][col] == 2 || level[bottomLeftRow][col] == 2 ) {
        link.x = (col * 8) + 8;
    }

}
if( key[1]) { //right
    var col = Math.floor((link.x+link.width) / 8);
    var topRightRow = Math.floor((link.y+9) / 8);
    var bottomRightRow = Math.floor((link.y+link.height-1) / 8);

    if( level[topRightRow][col] == 2 || level[bottomRightRow][col] == 2 ) {
        link.x = (col * 8) - link.width;
    }

}
It’s not perfect and I’ve had to add a -1 to each of Link’s width calculations otherwise he was getting stuck on walls due to inadvertanly checking a cell too far across. But, for now we have a level with real collidable geometry! Excellent work, team (all 2 of you reading this).
Have a play:
Progress
Check out the progress on version 0.6
Or see all the source code on Github.