I’m not going to go into the theories of animation and all its forms. There are Wikipedia articles for that. What we’re interested in is how we go about creating animations programmatically.
Animation techniques
In computer games, there are two methods of animation:
Computer generated animation - Where an object on-screen is either given an easing algorithm or a series of keyframes, and the computer calculates the frames between them.
Sprite animation - Much like the hand-drawn animated films, each keyframe is drawn out, and the game displays each frame sequentially.
Sprite animation is always cosmetic. After the line and pixel-based graphics of the earlier games, such as Pong or Space Invaders, but before today’s 3D rendered models, the way to enhance the graphics of our games was to draw the characters and backgrounds, separately, then load them in. But this would only be to, say, animate a character’s running animation. Moving the character around the screen, however, is still done programmatically.
Computer generated animation is a wide area of animation. In games, where something isn’t sprite animated, it’s computer animated. Taking a fully 3D game like Quake, Gears of War, or GTA, effects like fire are often still sprite animation, but everything else in the game world is computer animated. From objects rotating or moving, to the keyframed skeletal animations.
I think a lot falls under the animation umbrella. If anything moves on screen, it’s animation. It ties in with the Physics and AI, as they are just factors which affect an object’s animation. We’ll return to CG animation in part 2.
Sprite Animation
As we’re building a game from the golden age of sprite-based games, we’ll look at sprite animation first, as computer generated animation is a deeper discussion. At its heart, sprite animation is just like a cartoon. For each motion we’d like to convey, we draw a state for each key point. The fewer states we draw, the jerkier the animation and the slower we need to show each frame, the more we draw, the more fluid the motion, and the faster we need to show them.
Here’s Mario from Super Mario World on the SNES, running:

It consists of only 2 frames. It gets the point across, but there’s no grace in the movement. Now let’s see Elena, from Street Fighter 3: 3rd Strike in her ‘stance’ animation:
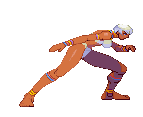
That motion alone is a whopping 58 frames. All hand drawn. Rather lovely, isn’t it? Street Fighter 3: Third Strike was released in the Arcade and on the Dreamcast, where hardware was powerful enough to handle the larger imagery. Back in the SNES era, things were a little more constrained. But that’s all part of the charm.
Animating Link
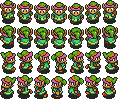
More pertinent to our mission, from the great Zelda sprite sheet we collected earlier here’s an example of one of Link’s animation: his down-facing walk.

A modest 7 frames. We can work with that. So how do we get Link walking in our game engine?
Performing sprite animation in code isn’t overly complex. It mostly comes down to preference rather than performance. Given the PNG sprite above, we could simply loop through each slice and once we reach the end, loop backwards through (the walk animation needs to swing like a pendulum so that the feet don’t suddenly jump from one foot to the next). But a nicer solution is to list sprite positions as an array and loop through that instead.
Before we get into the mechanics of our spriting engine, we need to take another look at our drawImage() function. In the last iteration, we drew Link to the screen with:
drawImage(link, player.x, player.y);
We pass in our image of Link, and his x and y coordinates. If we wanted to scale that image, we add two more arguments, width, and height, at the end:
drawImage(link, player.x, player.y, width, height);
Now, for whatever reason, if we want to slice an image, the arguments change order to:
drawImage(link, slice_x, slice_y, slice_width, slice_height, player.x, player.y, width, height);
Yay? Anyway, this is what we’ll have to use from here on out.
Going back to our code, to get Link animating, we can use:
function init() {
    // ...

    player.sequence     = [3,4,5,6,5,4,3,2,1,0,1,2];
    player.sequenceIdx  = 0;

    // ...
}

function main() {
    // ...

    // loop through the walking sequence
    var spritePos = player.sequence[player.sequenceIdx] * 16;

    ctx.drawImage(link, spritePos, 0, 16, 25, player.x, player.y, 16, 25);

    if( player.sequenceIdx < player.sequence.length - 1 )
        player.sequenceIdx++;
    else
        player.sequenceIdx = 0;

    // ...
}
Give Link an array of grid positions to transition between with, player.sequence, starting with the grid position of Link standing. During the loop, we calculate where each grid position corresponds to and move the slice area.
Okay, so that looks pretty fast and initially I thought it was too fast, however upon closer inspection of Zelda:LttP, it turns out that Link does animate that quickly (he’s just not always walking or that small…). But this is still a good time to deal with a common issue: framerate. The game renders at 60fps, but we don’t always want our animations to render that fast, too. To alleviate this we have to build in a way to run sub-systems of the main game loop at their own framerate. While the game runs at 60fps, we may want an enemy to animate at, say, 15fps, while the loop continues at 60. There are a number of different ways to do this, but they’re mostly variations on a theme.
It’s commonly called ‘Frame Rate Independence’. I don’t think there’s an acronym. For once. It’s one of the most important parts in our game as there are a great many game objects which will animate slower than the main loop.
The maths and code behind it is fairly simple. Our main loop is running at 60fps: 60 frames in one second. That’s 1000 / 60, or 16.6 recurring milliseconds per frame. To demonstrate, we’ll get Link running at 16fps. To do that, give Link two more properties:
player.fps = 16;
player.animationUpdateTime = 1000 / player.fps;
We want Link’s animation to run at 16fps, which is 1000 / 16 = 62.5ms between frames. Now we need a way to measure how much time passes between frames, which we can do with:
var lastTime = 0;

function init() {
    // ...

    lastTime = window.performance.now(); // store an initial time.

}

function main() {
    // ...

    var now     = window.performance.now(); // the time in ms on each loop.
    var elapsed = (now - lastTime) / 1000; // how many ms since the last time the loop ran.

    lastTime = now; // store the current ms to use next time!
}
Now we have a way to measure time per frame. The next step is to add up the elapsed times and after several frames, once the cumulative times add up to more than Link’s frame time, 62.5, we show the next frame and reset the counter:
timeSinceLastFrameSwap += elapsed;

// has enough time passed since the last frame was displayed?
if( timeSinceLastFrameSwap > player.animationUpdateTime ) {

    // enough time has passed. display the next frame.
    if( player.sequenceIdx < player.sequence.length - 1 )
        player.sequenceIdx++;
    else
        player.sequenceIdx = 0;

    // reset the counter
    timeSinceLastFrameSwap = 0;
}
A 16fps Link!
Obviously, Link should only animate when the user interacts, so let’s do a bit of code maintenance and get Link walking around a bit more convincingly.
Check out the progress on version 0.5 here
Finishing Up
First thing to do is update our Link sprite and add in his other frames for facing the other directions. But before that, a trip down development techniques lane. A common space-saving technique for older games was to only draw frames for left or right and just flip the image for the opposing direction, and according to our sprite sheet, Nintendo did just that. It does mean that a left-handed Link becomes temporarily right-handed when facing right. But no one seemed to notice. In addition, a lot of games went further and cut up the most varied character images into smaller pieces like heads, bodies, legs, weapons, etc... And built them up in-game instead. Some incredibly clever techniques were devised when attempting to push these older, more constrained systems to their limits.
Instead I created and added the left sequence to give us our current Link spritesheet:
With that saved to our project we can dive into the code and go about displaying the frames correctly. In order to handle the logic, we’ll be throwing a lot more code at the loop, and it’s already starting to get pretty cramped in there. So the first thing we should be doing is creating a proper object for intrepid hero, as there will be a fair amount of code specific to his movement and display soon, and inevitably even more later in the project. That looks a bit like this:
function Link(x, y) {

}
I’ve gone with the functional style for now as it gives us the class-like object mechanism we want. We can ‘instantiate’ it later with the new operator while also passing in values, e.g. new Link(100,100). We may use objects later, but for now, functions are a simpler construct which quickly give us the flexibility we need.
Now we can start moving some of the Link-specific code and variables from main(), init() and even the global variables into that function, including some setup code like, loading in his image file:
function Link(x, y) {

    this.img        = new Image();
    this.img.src    = 'images/link.png';

    this.x = x;
    this.y = y;

    this.fps = 16;
    this.animationUpdateTime = 1000 / this.fps;

    this.timeSinceLastFrameSwap = 0;

    this.sequences = {
        'stand-down':   [3],
        'stand-up':     [10],
        'stand-right':  [17],

        'walk-down':    [3,4,5,6,5,4,3,2,1,0,1,2],
        'walk-up':      [10,11,12,13,12,11,10,9,8,7,8,9],
        'walk-right':   [17,18,19,20,19,18,17,16,15,14,15,16],
        'walk-left':    [24,25,26,27,26,25,24,23,22,21,22,23]
    }
    this.sequenceIdx = 0;
    this.moving = false;
    this.facing = 'down';

}
When we create our Link object, it’ll create an image and assign itself the new sprite we created, positions itself with the values passed in, calculates and stores the FPS which it will run at and, finally, store the sequences of frames for each animation. As you can see, I’ve added a few more than before. I’ve taken a page out of Shaun Inman’s book and Link handles standing and walking in three directions. A few more variables were needed to store which way Link faces and whether he needs animating.
It’s a good start, and we’ve streamlined main() and init() a bit too. But we can do a bit more. Link should also handle updating his animation and drawing to the canvas. For that, two functions will come in handy, update() and draw(). It’s good to break up some of that logic into two functions in case we need to update Link but not draw him to the canvas for whatever reason:
function Link(x, y) {

    // ...

    this.update = function(elapsed) {
        this.timeSinceLastFrameSwap += elapsed;

        // half the animation speed
        if( this.timeSinceLastFrameSwap > this.animationUpdateTime ) {

            // which sequence to use
            var seq = this.moving ? 'walk-' : 'stand-';
            seq += (this.facing == 'left' ? 'right' : this.facing);

            // the current sequence array
            var currentSequence = this.sequences[seq];

            if( this.sequenceIdx < currentSequence.length - 1 )
                this.sequenceIdx += 1;
            else
                this.sequenceIdx = 0;

            // row and column in the sprite grid for the current frame
            var col = currentSequence[this.sequenceIdx] % 7;
            var row = Math.floor( currentSequence[this.sequenceIdx] / 7 );

            this.offsetX = ( col * 16 ) + ( col * gutter );
            this.offsetY = row * 25;

            this.timeSinceLastFrameSwap = 0;
        }
    }

    this.draw = function() {
        ctx.drawImage(this.img, this.offsetX, this.offsetY, this.width, this.height, this.x, this.y, this.width, this.height);
    }

}
We need to use this so that those functions can be used outside of the Link object, e.g. link.update(). You may have noticed a few more alterations to the code which handles the animation and draws to the canvas. When a frame is ready to be updated, according to Link’s independant framerate, what we now do is check which way he is facing, along with whether or not he is moving. Both of these attributes are currently determined in main(). Once this is established, we find the appropriate sequence array and then calculate which frame to show according to the sprite grid.
The grid is 7x4 cells at an annoying 17px by 25px. Each cell is numbered from 0 at top left to 27 at bottom right. By dividing by 7 we can calculate the row, then using a modulus (%) of 7 we can get our column number.
During all this, I’ve re-appropriated the link variable as we no longer need it as the link image, it will now be our player object. Creating objects is typically a job for init(), so it’s been given a cleanup:
function init() {
    // Initialise the player!
    link = new Link(100, 100);

    // Setup the Input
    Input.init();

    lastTime = window.performance.now();
}
And, looking at main(), there’s been some more streamlining:
function main() {
    /** Here's where we handle all the input, logic and drawing to the screen per frame. **/
    var now = window.performance.now();
    vae elapsed = (now - lastTime);

    lastTime = now;

    // Clear the screen
    ctx.clearRect(0, 0, 256, 224);

    var speed = 2;

    link.moving = false;

    // Handle the Input
    if (key[2]) {
        link.moving = true;
        link.facing = 'up';
        link.y -= speed;
    }
    if( key[3]) {
        link.moving = true;
        link.facing = 'down';
        link.y += speed;
    }
    if( key[0]) {
        link.moving = true;
        link.facing = 'left';
        link.x -= speed;
    }
    if( key[1]) {
        link.moving = true;
        link.facing = 'right';
        link.x += speed;
    }

    link.update(elapsed);

    link.draw();

    // loop it!
    requestAnimationFrame(main);

}
We are still handling input here for now, so we set Link to standing still unless a key is pressed. Then at the end we call our update() and draw() functions.
Phew! We got through a lot here. And, it’s only just getting started. But I’m pretty happy we have Link wandering round the screen looking like a proper game character.
Check out the progress on version 0.5.5
Or see all the source code on Github.